Resources for the Faculty of Medicine Session for Microsoft Excel®
Advanced Session
This site is to provide links and resources that are not in the course notes. Most of the documentation for what we will be doing is in those notes or in the sample files that we will be using.
Overview
This session is for people who need to understand some of the more advanced aspects of Microsoft Excel®. This will include aspects of automation where Excel can help you to analyse your data and even reverse-engineer your results, while saving sets of assumptions along the way. You will also create user defined functions and macros to automate routine tasks.
Note: This course relies heavily on concepts and skills introduced in the Excel Introduction for the Faculty of Medicine.
Course Description
We will:
- Use some of the advanced options available in the Back Stage View (File Tab)
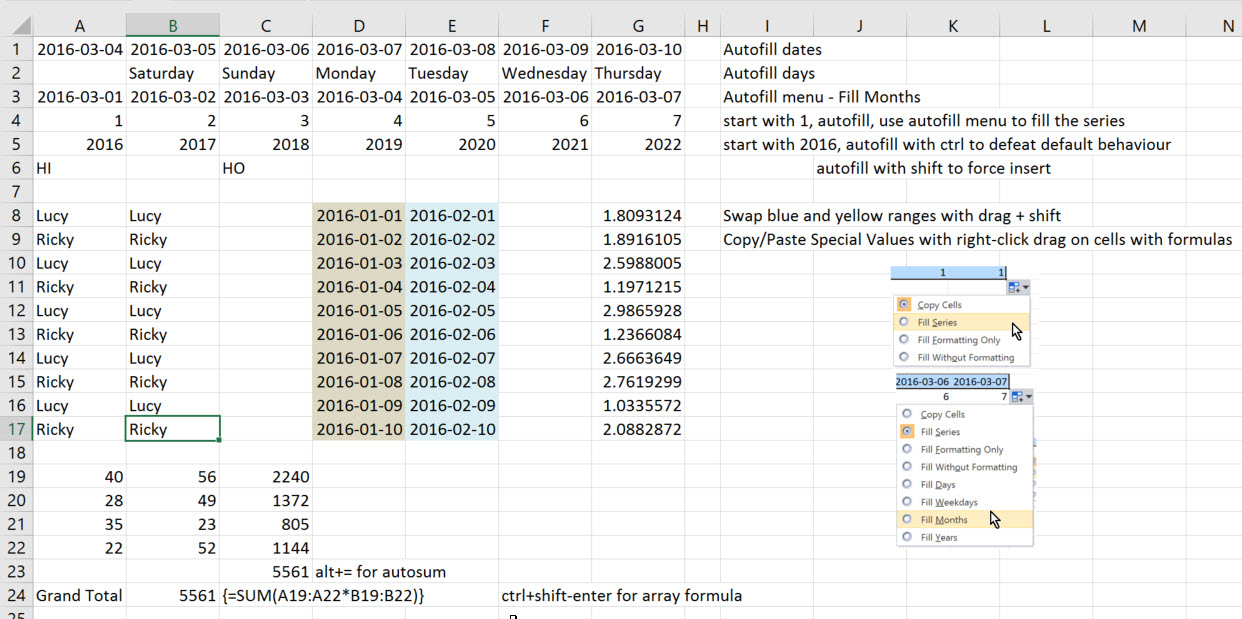
- Learn more tricks with Autofill, Copy/Paste, Insert with keystroke and mouse combinations and other quick ways to boost your productivity with Excel.
- Explore advanced functions that read data and generate results based on specific conditions.[examples: IF, SUMIF, ISNA]
- Secure your worksheets and workbooks
- Create Macros
- Optional: and start to work with Visual Basic for Applications (VBA)
- Expand and extend your previous Work with Tables and PivotTables
Duration: 6.5 hours
ObjectivesBy the end of this session you will be able to
|
Prerequisites
This course relies heavily on concepts and skills introduced in the Excel Introduction for the Faculty of Medicine.
Printed Material
You will have a workbook for reference and to add your own notes.
Computer Equipment
The sessions are conducted in a computer lab, and you will have a computer provided for your use.
Sample Files
We will use these sample files during our session. These will be available after the session.
Sample files
Click on any file to preview it in Excel on the Web, but if you want to work with it, use the download button to copy it to your local hard drive before attempting work with the file.
Or
Instructional Methods
- Hands-on labs
- Discussion
- Lecture
Course Materials
- Web site
- Course notes
- Printed copies of on-screen lecture notes available on request during lectures
No Recording or Pictures in the Lab
Please note: Taking pictures or video during the course sessions is not permitted. All the course materials and lecture notes are available in physical form and on the web.
Sample Files
Sample Files
Click on any file to preview it in Excel on the Web, but if you want to work with it, use the download button to copy it to your local hard drive before attempting work with the file.
Or
download all the files as compressed folder
Reflection
How are we doing?

See the last page of your notes: Things I really want to remember.
Backup Support Site
Warm Up Basic Skills
What you saw when it was done

Fill data automatically in worksheet cells
How to swap columns in Excel by drag-n-drop and other ways to move columns
Security
Slideshow: Office 2010 Security: Protecting your files
Microsoft Office Video: Protect worksheets and workbooks
Macros
Video: Create and run macros in Excel 2010
Video: Save time by creating and running macros in Excel 2010 video 1 of 4
User Defined Functions (VBA)
Code for User Defined function
Code for User Defined Function Fahrenheit
Function Fahrenheit(CelsiusDegrees)

  'Returns degrees Fahrenheit for given degrees Celsius

  Fahrenheit = CelsiusDegrees * 9 / 5 + 32

End Function
Visual Basic for Applications VBA
Details

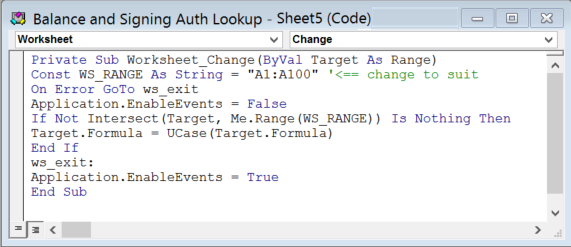
VBA from Balance and Signing Auth Lookup – Sheet 5 SpeedChart Balance Check
Private Sub Worksheet_Change(ByVal Target As Range)


Const WS_RANGE As String = "A1:A100" '<== change to suit

On Error GoTo ws_exit


Application.EnableEvents = False


If Not Intersect(Target, Me.Range(WS_RANGE)) Is Nothing Then


Target.Formula = UCase(Target.Formula)


End If


ws_exit:


Application.EnableEvents = True


End Sub
Cut & Paste Code and Examples
Details
Data1
Age
Birthdate is in cell J2
=INT((NOW()-J2)/365.24)
PivotTable
Month
Returns the Month as Text (not a date formatted as Month)
Cell C2 contains a date
=TEXT(C2,"mmm")
Year
Returns the Year as Text (not a date formatted as Year)
=TEXT(C2,"yyyy")
Week
=WEEKNUM(C2)
Tables
details
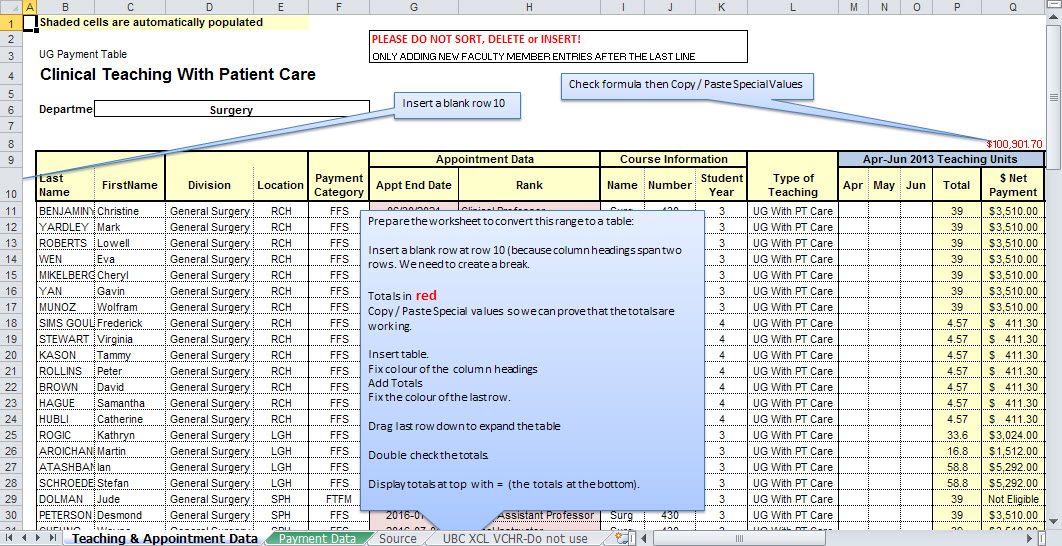
There are many built-in features that you can apply when you convert a range into a Table. Select a single cell in the range you want to convert, then choose the Insert Tab, then click the Table command.
In the example below we will convert an existing table (with a lot of formatting), so we will have to do some work before hand to make things work better. If there were no formatting and all the column headings were in a single row, we wouldn’t have to do any preparation.

References
PivotTables
Here is a quick video of creating a PivotTable based on this file:
File: PivotBowlingScores.xlsx
Resources
- What’s New in Excel 2013 | What’s New in Excel 2013 Word document 25 pages
- What’s New in Excel 2010
- Discontinued features and modified functionality in Excel 2010
- Microsoft Excel: Quick tips and tricks
- Use sparklines to show data trends
- Keyboard Shortcuts in Excel 2010
- Office Excel 2010 Charts And Graphs
- How to create a basic chart in Excel 2010
- The Office Show: Visualizing Data with Excel
- Table Improvements in Excel 2010
- What’s New in Excel 2010
- Changes in Excel 2010
- Excel Templates
- Specific to Advanced Session
- Protect worksheets and workbooks Excel 2013 version
- Array Formulas – Guidelines and Examples
- Array Formulas video tutorial
- IS-functions
- Get in the loop with Excel macros
- SUMIF by colour
- Why INDEX MATCH is Better Than VLOOKUP
